Unlock the secrets of left-handed firearm illustration with expert techniques and insider tips
Contents
- 1 The Art of Lefty Gunplay Drawing: An Introduction
- 2 Understanding the Anatomy of a Firearm
- 3 Essential Drawing Techniques for Left-Handed Artists
- 4 A Step-by-Step Guide to Drawing a Pistol (Lefty Edition)
- 5 Bringing Your Lefty Gunplay Drawing to Life
- 6 Conclusion: Your Journey into Firearm Illustration
The Art of Lefty Gunplay Drawing: An Introduction
A Fascinating World of Illustration
Step into the captivating world of lefty gunplay drawing, a unique corner of the art world where technical skill and creative expression collide. This isn’t just about copying pictures of guns; it’s about capturing their very essence—their power, their intricate beauty—all from a left-handed point of view. Whether you’re a pro looking for a new challenge or just starting, this guide will give you the inside scoop on mastering this amazing craft.
When you hear “gunplay,” you might think of blockbuster action movies, but in the art world, it’s something else entirely. It’s the dance of lines, shadows, and textures that makes a firearm leap off the page. It’s a beautiful blend of precision and creativity, where every single pencil stroke tells a story.
The Left-Handed Advantage
Being a lefty in a right-handed world can feel a bit like swimming upstream sometimes, but it also gives you a unique edge. Left-handed folks often see and process things differently, which can lead to a one-of-a-kind artistic style. This guide is made just for you, to help you tap into your left-handed strengths and knock down any barriers in your way.
We’ll dive into techniques that are perfect for left-handed artists, from setting up your creative space to mastering smudge-free shading. You’ll soon see that being left-handed isn’t a weakness—it’s your secret weapon on your artistic journey.
Your Guide to Mastering the Craft
Think of this guide as your personal roadmap to becoming a lefty gunplay drawing pro. We’ll get into the nitty-gritty of firearm anatomy, check out essential drawing techniques, and walk you through drawing a pistol, step-by-step, from a lefty’s perspective. You’ll also pick up some cool tricks for adding realism and a story to your art, turning your drawings into visual masterpieces.
Our mission is to give you the tools and confidence you need to create breathtaking firearm illustrations. So, grab your pencils, and let’s get this awesome artistic adventure started.
Understanding the Anatomy of a Firearm
Key Components to Know
Before you can draw a gun that looks real, you’ve got to know what makes it tick. Get familiar with the main parts, like the barrel, slide, frame, grip, trigger, and sights. Understanding how these pieces fit together is the secret to making your drawing believable.
Spend some time checking out different kinds of firearms to see what makes them unique. The more you know about what you’re drawing, the more authentic your art will be.
The Importance of Proportion and Perspective
Proportion and perspective are the building blocks of any realistic drawing. When you’re drawing guns, getting the proportions just right is a huge deal. If the barrel is a little too long or the grip is a bit too small, it can make the whole drawing look off.
Perspective is just as important. Knowing how to create the illusion of 3D space on a flat piece of paper will give your drawings that extra pop of realism. We’ll look at how you can use perspective to create drawings that are both dynamic and powerful.
Essential Drawing Techniques for Left-Handed Artists
Setting Up Your Creative Space
For left-handed artists, having a well-organized workspace is a game-changer. Try putting your main light source on your right side. This way, the light shines right on your paper without your hand casting a shadow. It’s a simple trick, but it makes a world of difference for your accuracy.
Pro Tip: Also, think about where you put your tools. Keep your pencils, erasers, and other gear on your left side, so you can grab them easily. This means less fumbling around and more time in your creative zone.
Mastering Clean and Confident Lines
One of the biggest headaches for left-handed artists is smudging your work as you draw. To avoid this, try turning your paper a little bit to the right. This lets your hand rest below the part you’re drawing, so you’re less likely to smear your lines.
Another great trick is to draw from right to left whenever you can. This keeps your hand off the fresh lines, so your artwork stays clean and crisp. It might feel weird at first, but with a little practice, it’ll become second nature.
Shading and Texture Without the Smudge
Shading and adding texture can be a real challenge for lefties, but with the right moves, you can get amazing results. When you’re shading, use a guard sheet—a clean piece of paper or a thin sheet of plastic—under your hand. This creates a barrier that stops smudges in their tracks, so you can work without worry.
Play around with different shading techniques that don’t require a lot of hand movement, like cross-hatching or stippling. These methods let you build up tone and texture with small, controlled marks, giving you more control and keeping your art looking sharp and professional.
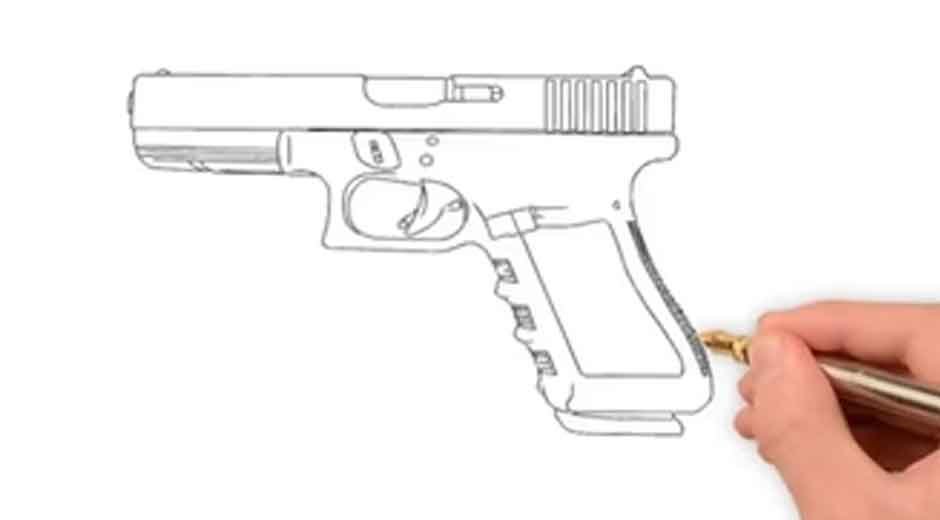
A Step-by-Step Guide to Drawing a Pistol (Lefty Edition)
Step 1: Sketching the Foundational Outline
Start by lightly sketching the basic shapes of the pistol. Use simple shapes like rectangles and triangles to get the overall structure and proportions down. As a lefty, starting on the right side of the page can help you see what you’re doing and avoid smudging.
Just focus on getting the general shape of the gun right. Don’t sweat the small stuff just yet; the goal here is to build a solid foundation.
Step 2: Refining the Intricate Details
Once you’re happy with the basic outline, it’s time to start adding the finer details. This is where knowing your gun anatomy really pays off. Carefully draw in the trigger, trigger guard, slide, and sights, making sure they’re in the right place and the right size.
Take your time with this part. The details are what will make your drawing come to life. Use a sharper pencil to get those clean, precise lines that define all the different parts of the pistol.
Step 3: Adding Depth and Dimension with Shading
Now it’s time to make your drawing pop with some shading. As a lefty, don’t forget to use a guard sheet to keep your work clean. Figure out where your light is coming from, and then start adding shadows to the areas that would be dark.
Use different shading techniques to create a sense of realism. Smooth transitions from light to dark will give your drawing a 3D feel, making the gun look like you could reach out and grab it.
Step 4: Applying the Final Touches and Highlights
In the last step, you’ll add the finishing touches that will make your drawing shine. Use a kneaded eraser to lift out highlights on the metal parts, creating the look of a shiny, reflective surface. This is a key step for getting that realistic metal texture.
Step back and take a look at your work. Make any little adjustments to the shading or details to make your drawing even better. These final touches will take your art from a simple sketch to a stunning piece of firearm illustration.
Bringing Your Lefty Gunplay Drawing to Life
Creating Hyper-Realistic Textures
To take your gun drawings from simple sketches to hyper-realistic masterpieces, you need to master texture. Pay attention to how light hits different materials. Polished metal will have sharp, bright highlights, while a matte finish will look softer and more spread out.
As a left-handed artist, you can use your unique perspective to your advantage. Play around with different kinds of pencils and blending tools to create a whole range of textures. Don’t be afraid to get up close and personal with your subject, noticing all the little imperfections and wear marks that tell a story.
Weaving a Narrative into Your Artwork
Beyond just technical skill, what really makes a drawing great is its ability to tell a story. Think about the story you want to tell with your art. Is the gun a brand-new collector’s item, a beat-up tool from a hundred battles, or something else entirely?
Remember: The details you add can all be part of the story. A scratch on the barrel, a custom grip, or the way the gun is positioned can all add layers of meaning to your drawing. Let your imagination run wild and create a piece of art that’s not only technically awesome but also emotionally powerful.
Conclusion: Your Journey into Firearm Illustration
Key Takeaways for the Aspiring Artist
Starting your journey into lefty gunplay drawing is an amazing experience that blends technical skill with artistic freedom. Remember that getting good at this is a marathon, not a sprint. The most important things to take away from this guide are to embrace your left-handedness as a superpower, to really study the anatomy of firearms, and to practice the special techniques that will help you create clean, amazing art.
Don’t get discouraged if you hit a few bumps in the road. Every artist, no matter which hand they use, has to go through a learning process. The most important thing is to stick with it, keep practicing, and have fun making art.
The Path Forward: Practice and Exploration
Your journey as a lefty gunplay artist is just beginning. The road ahead is all about practice and exploration. Keep drawing every day, try out new techniques, and look for inspiration all around you. The more you draw, the more confident and skilled you’ll get.
Challenge yourself to draw all kinds of firearms, play with different compositions, and create your own unique style. The world of firearm illustration is huge and full of possibilities. With a little dedication and a lot of passion, you can make your mark and create art that’s both technically incredible and deeply personal.


")